1 Introduction
In the winter semester of 2023/24 I got the chance to participate in the lecture Interaction in Virtual and Augmented Reality. The goal of this lecture was to implement our own locomotion and object interaction techniques allowing the user to get through a VR parkour. We were provided with a template Unity project, so that we could focus on the techniques we wanted to implement instead of scene setup and basic parkour logic.
We were also given Meta Quest headsets, which we used to develop and run our projects on.
My project
My idea was to implement a locomotion technique based on bow and arrow, combining the fun gameplay of target shooting
with locomotion through teleportation. As the user does not perceive high amounts of vection in the instant
teleportation, there is no conflict with the absence of actual physical movement. Therefore, this type of locomotion
should not cause a lot of motion sickness. The specifics of my locomotion technique are going to be explained in the
implementation part.
The following video shows me completing one round of the parkour in my final implementation:
Take a look at the code or try out the game yourself
Game controls
When starting out, both the teleportation bow and the coin collection bow are stored in the two bow holsters on your
back. You can reach over your left or right shoulder to grab a bow. When you want to change to the other bow, you can
put your bow back into the empty holster and grab the new one from the other holster.
Here is an overview over the controller mapping in the game:
- Grab button – press and release: take a bow or put a bow away
- Grab button – keep pressed: grab and draw a bowstring
- A/X Button: confirm current t-shape orientation
- B/Y Button: reset your position to the last checkpoint
- (Start Button: save JSON-file with your current stats)
The structure of this documentation
Chapter 2 includes the slides of the three presentations I held during this lecture. Following this, chapter 3 gives details about the main parts of my implementation. Finally, chapter 4 shows the results of the small demo-evaluation we were supposed to carry out at the end of the lecture.
2 Presentations
During the course of the lecture, each participating student gave three presentations. The first one was a quick idea
pitch, where we presented our first ideas for the techniques we wanted to implement to the class. After every idea
pitch, there was a discussion where we tried to find answers for open questions and think of ways to improve the ideas.
Previous to the second presentation, each student was assigned a tutorial about some aspect of developing for VR. After
following the tutorials, we presented them to the rest of the class, talking about our opinion of the tutorial, what we
learned, which problems we encountered and how they could be applied in our own projects.
In the final lecture slot, we all gave a final presentation of our project. We talked about our implementation journey,
the problems we encountered, what we learned along the way and how our small demo evaluation went. Following each
presentation, the rest of the class had a few minutes to try out the corresponding project. It was really fun to test
all the different approaches to locomotion and object interaction implemented by the other students.
I have embedded the slides for my three presentations below, so feel free to skip through them if you want to know more.
Presentation 1: Idea pitch
Presentation 2: Tutorial review
Presentation 3: Final project presentation
3 Implementation
3.1 Assets
Here is a list of the assets I used in my project in addition to the ones included in the template project we got from Wen-Jie:
- Models for the bows and arrows
- Model for the targets
- An asset that allowed me to fracture the target model while keeping its texture intact
- A few sound effects under Creative Commons from freesound.org as well as this sound from user gronnie
3.2 Bow and arrow mechanics
When starting the implementation, I looked for tutorials on how to implement VR archery in Unity. However, after taking
a look at this tutorial, I decided to implement the mechanics from
scratch instead. The main reason was that I wanted to be independent of the specific XR plugins used in the tutorials in
order to avoid version conflicts and compatibility issues down the line. Apart from that, I also appreciated the
additional challenge of coming up with own ideas for building a bow-and-arrow system.
Therefore, I ended up adopting only two ideas from the tutorial, how to visualize a bow string using a line renderer and
how to rotate arrows along their rigidbody’s trajectory.
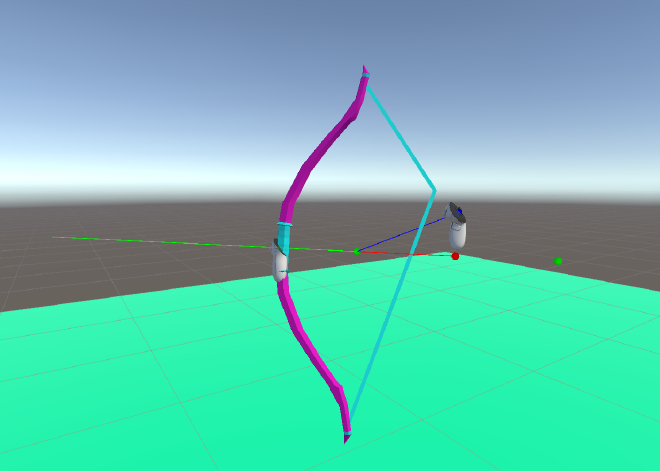
Grabbing bows and bowstrings
After cutting out the included fixed bowstring from the bow model using Blender, I replaced it with a line renderer. As
shown in the tutorial, this allowed me to change its appearance, visualizing a drawn bowstring when needed.
Then I implemented a custom grabbing system using colliders on the controllers. Using collision events, I am keeping
track of which controller is currently overlapping with which bow or bowstring. Here is a snippet showing the variables
storing this information (feel free to check out
the whole script for more
details):
| |
It took quite a bit of debugging to make sure that this information is always correct, including all edge cases. However, based on this system, it was then really easy to implement grabbing and releasing bows and bowstrings whenever the according button was pressed or released (see video 1).
Here is an image of how I was debugging a problem, where the bowstring did not follow the controller as it was supposed to. I drew some gizmos in the editor, trying to figure out why the string did not bend along the red line. In the end, all I was missing was a call of InverseTransformPoint in the script handling the bowstring.
Shooting arrows
For the implementation of actually shooting arrows I relied on Unity’s physics. Simply applying a force to the arrow’s
rigidbody in the direction in which the arrow is currently facing was enough to achieve a good arrow trajectory.
However, at this stage, the arrows did not rotate along with their trajectory (see video 2). To fix this (see video 3),
I only had to add the following line of code to the FixedUpdate
(whole script), which I had already
seen in the tutorial mentioned above:
| |
Haptic feedback and sound effects
In order to improve the user experience and immersion when using bow and arrow, I added haptic feedback and some sound
effects.
While the user is drawing a bow, the controller starts vibrating. The vibration’s intensity changes according to how far
the bow is drawn. Once an arrow is shot, there is a small bump in vibration intensity, emulating the arrow passing the
bow. After this bump, the vibration stops.
Video 4 contains the sound effects I added for shooting arrows:
3.3 Locomotion
Once the basic archery mechanics were done, implementing the locomotion technique was pretty straightforward. I started
by creating two different bows. The first one is small, has less power, is brightly colored and is supposed to resemble
a toy bow. The second one is bigger and has more power. I achieved the different color schemes by simply editing the
colors of the texture provided in the asset using Gimp (see images 1 and 2).
Through this separation, I wanted to restrict the players’ teleportation range with the toy bow, while still allowing
them to have fun collecting distant coins with the strong bow.


Teleportation
Whenever an arrow shot with the toy bow hits the ground, the arrow is stopped and the player’s position is changed in order to execute the teleport. However, when simply setting the position of the TrackingSpace-gameobject to the point where the arrow hit the ground, I noticed that the teleport was a little off sometimes. The reason for this was that the player’s head is moving away from the TrackingSpace-origin a bit when looking or walking around, so I had to account for this offset. The following code snippet (whole script) shows how I correct the offset between the headset and the origin, making sure the player’s head is teleported exactly to where the arrow landed:
| |
Video 1 shows a test of the finished teleportation mechanic, allowing the player to teleport with the toy bow only. (The floor with the colored squares helped when testing how precise the teleport is.)
Collecting coins
Coins can be collected by hitting them with an arrow shot with the stronger bow, which was easy to implement using the
colliders on the coins and arrows. The arrows do not disappear or stop when hitting a coin, though, so you can collect
multiple coins with one arrow. These coin-collection arrows only stop when hitting the ground or other obstacles,
without triggering a teleport.
Once teleportation and coin collection were completed, I integrated them in the parkour scene from the template project.
Video 2 shows a demo of the resulting locomotion technique.
3.4 Object interaction
The template project contains object interaction tasks, where you grab an opaque t-shape with your controller to translate and rotate it, trying to align it as closely as possible with the transparent t-shape. You can take a look at this in one of Wen-Jie’s demonstration videos.
My version of the interaction task - translation
Once the task starts, the player automatically switches to a third bow, the interaction bow. This bow shoots arrows with
an opaque t-shape attached to them.
In addition to the transparent t-shape, a target appears, which is moving back and forth in a straight line through the
transparent t-shape. The player now has to shoot at the target, trying to hit it close to its center, in addition to
timing the shot in a way that the target is hit when it is positioned directly behind the transparent t-shape. The
opaque t-shape will be placed at the point where the arrow hit the target. This way, the player tries to place the
opaque t-shape as close to the transparent one as possible.
My version of the interaction task - rotation
After placing the t-shape, it has to be rotated in order to match the transparent one’s orientation. To do this, the
orientation of the player’s bow is mapped onto the opaque t-shape. Once the player is satisfied with the current
orientation, it can be locked in by pressing the A- or X-button.
The following video shows my version of the object interaction task:
3.5 Finishing touches
After completing the core implementation described in the last sections, I improved my game with a few finishing touches. Some of them improve the user experience in the core gameplay, and some were just nice additions. In this section, I will briefly explain the most important ones of these changes.
Restricting valid teleport destinations
When testing my game, I noticed that you could teleport yourself to the side of the bridge or the side of the inclined street in the parkour. In order to fix that, I only allowed teleporting the player, if the arrow triggering the teleport hit the ground from the top. To achieve this, I calculate the angle between the collision’s normal and the global up-axis. Only if this angle is smaller than the configured threshold, e.g. 45 degrees, a teleport is triggered. The following snippet shows the according code from the script Arrow.cs:
| |
Shattering targets
As it looked a bit weird to have the targets just disappear when they are hit, I wanted to have them fracture into
pieces instead. First, I tried breaking the target model into pieces using the Cell Fracture tool in Blender. While I
was content with the resulting fractured mesh, the original texture did not work with the new meshes anymore.
Luckily, I then found the OpenFracture asset, which allowed me to fracture
the target model directly in the Unity editor while preserving the original texture. After that, I added a new sound
effect for the targets being destroyed.
Together, this made it a lot more fun to complete the interaction tasks. Video 1 shows how the targets get destroyed
when hit by an arrow:
Combo system
While I felt like it was already pretty satisfying to collect coins, I wanted to add a little bit of depth to this
mechanic. Therefore, I added a combo system, counting how many coins are collected with each arrow.
The current combo counter is then displayed as a floating text next to the collected coin. Additionally, the sound
effect playing whenever a coin is collected is pitched higher along with the increasing combo. These small changes
encourage the player to try to collect as many coins with one arrow as possible.
Video 2 shows a demo of this combo system:
Arrow trails
In the VR headset, the flying arrows are easier to track with your eyes than it seems like in the 2D videos. Still, I wanted to improve the arrow visibility a bit, so I added simple colored trails. I matched the trail colors with the different bows to strengthen their separate identities. The following three images show these differently colored arrow trails:


Automatic data logging
As I will explain in the next section, we did a pseudo evaluation at the end of the lecture. Because of that, the game
is automatically collecting some data about the gameplay, for example how many coins the player collected or the
accuracy in the interaction tasks. In the template project, this data is only written to a UI-canvas inside the headset,
so you have to transcribe it at the end of each participant’s run.
I wanted to simplify this process, especially because I introduced additional metrics to be collected. Therefore, I
wrote a
script storing the collected data in a JSON-file
using Unity’s JsonUtility. This way, I could just
copy over the save files from the headset to my laptop, without the need to manually transcribe anything.
As an example, here is the save file from my run:
| |
Splash sounds when shooting into the water
This last aspect did not really affect the main gameplay, but I still wanted to add it as an interesting detail. The
parkour’s environment contains a river, which you usually do not interact with. But, you pass over a bridge crossing
this river, so you might notice it. Just in case a player might wonder what happens when shooting an arrow into the
water, I added splashing sounds.
So, I first made sure that arrows disappear in the water, instead of just sticking to the mesh’s surface like with the
street, buildings, etc. Then I added the sound effects, playing whenever an arrow lands in the water. Check out video 3
for an example:
4 Evaluation
At the end of the lecture, we were supposed to conduct a very small user study. With only two participants in addition
to ourselves, this study does not produce any real insights, of course. Instead, conducting this study was a fun way of
getting a small first impression of how such studies work.
For my study, I let the participants get used to the mechanics for a few minutes first. Then, I gave them 10 minutes to
play the game, instructing them to get as far as possible and collect as many coins as possible. Finally, I asked them
to rate the motion sickness, presence and fun they experienced.
With all the data stored in the JSON-files, I had quite a bit of information to work with, so I calculated various
metrics. While there are no matching results from the other students’ projects for most of the metrics, it was still
interesting to see how my values compare to the other two participants’ ones. Some, but not all metrics depict that I
had a lot more time to practice the mechanics during development. The low motion sickness fits with the locomotion being
based on instant teleportation, where the user does not perceive continuous movement.
You can take a look at the data yourself in the following charts.
Metrics based on the data recorded during gameplay


Questionnaire results


